
How to shoot video on a smartphone
Occasionally clients have asked us about how to shoot video on a smartphone:?”Could we shoot the?video ourselves and hand the footage over to you for editing?”
Whilst they may not have sufficient?budget for a professional video shoot, the contrast in quality of the finished video is incomparable. But does it have to be?
With mobile phones nowadays being able to capture both HD and 4K footage, there’s a case for allowing clients to self-produce their material which?as?long as they have the right guidance for how to shoot?video on a smartphone?would produce highly usable footage to fulfil their video requirements.
Let’s say for instance that the brief was to create a short (2?3 minute) video covering employees’ best achievements of the year. This would involve filming various employees talking to camera, detailing their ‘best achievement’. These interviews could be filmed in a quiet office with plenty of space in order to achieve a variety of shots (with contrasting backgrounds).
If shooting on an iPhone 6 (or equivalent), I would recommend selecting 1920×1080 resolution at 30fps (frames per second), always keeping the phone horizontal (landscape)?NOT upright for portraits!
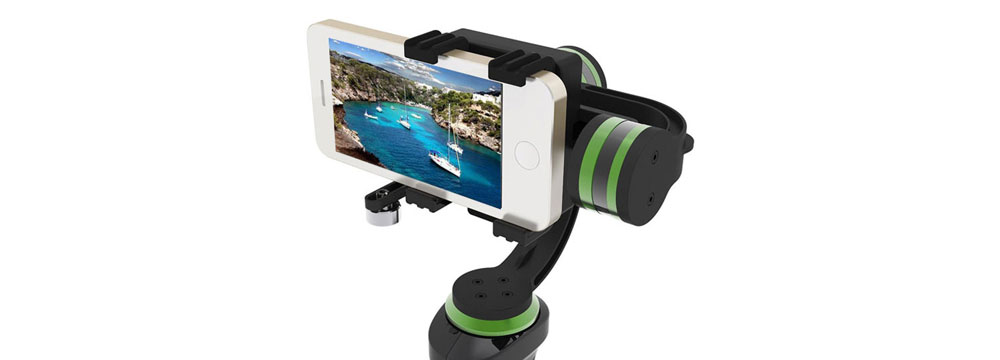
In order to hold the phone stable I’d recommend using either a Tripod iPhone Adaptor on a good tripod of your choice, or using a Lanparte HHG-01 Ultra 3-Axis Gimbal, which stabilises?handheld shooting.
Good lighting will strongly enhance the quality of the final video. It can be achieved through a 3-point lighting set-up which involves using three separate lights to ‘key’ (the main source of light), ‘fill’ (to fill in the shadows and?create contrast), and ‘back light’ the subject (to separate the subject from the background and?create depth). The key should have the highest intensity, with the fill being at medium intensity and the back light on relatively low intensity. To avoid anything too harsh (which will look unnatural), it’s worth using a diffuser?or ‘softbox’ to soften the intensity of the lights. You can also use colour-correcting gels to alter the colour temperature of the lights.

(Image source)
By far the biggest issue with recording video on mobile phones is sound quality. The Rode Wireless Microphone Filmmaker Kit provides a great solution for capturing good sound and is compatible with iPhones through its 3.5mm TRS jack connection.
Don’t record in a noisy environment and remember to turn off air conditioners and mobiles?even the quietest ‘off camera’ noise can cause big problems when editing! A carpeted room with soft furnishings (to stop room echoes and?reverberations) is better than one with?hard surfaces that reflect sound. A clip-on lapel microphone will capture the speaker’s voice and negate unwanted noise?and always conduct a sound check before you starting shooting. I?d suggest filming a sample and when playing it back, listening on some headphones / ear buds to check the sound quality. You want the sound to be as clean and clear as possible.
It’s important to envisage how the video will look once edited together. You MUST be able to provide the editor with a shot list detailing what was shot and what’s usable. This is really important because an?editor can spend hours (of chargeable time!) trawling through footage to find what’s usable. If we are onsite for the shoot, we can do this, but if we’re not there, ensure you write a detailed brief of how you see the clips being edited together.
To begin shooting, press record and hold a piece of paper in front of the camera with the person’s name on, then say “Take 1”, “Take 2”, etc. before each one. This makes it much easier to specify what needs to be used in the edit when viewing back the files. Leave a gap?(ideally 1?2 seconds) before the subject starts talking. Ensure they maintain their eye-line throughout?either straight into camera or slightly off camera to the interviewer, depending on the style of the video.
At the end of the day, experience is everything. Professional videographers have the necessary equipment and knowledge to fulfil the?requirements of the brief. It’s helpful to have the key stakeholder?present at the shoot in order to prompt and make suggestions to the subjects regarding their content:?ensuring that everyone understands the purpose of the video and what is trying to be achieved, this will lead to a much stronger final piece.
If you’re prepared to invest the time and money into producing your own video content then hopefully this article has offered you some insight into the equipment you’ll need?and?some of the fundamentals you should bear in mind when shooting.
When?hiring a professional team to create a?video, you are paying for their expertise and know-how. They will add production value and will?capture quality footage. Whilst the equipment listed and points raised in this article provide you with the means of producing your own basic content, the success of the final video will be determined by the quality of what is shot and how it?s shot. Editors can only work with what they’re?given!
Matt Jackson,?Multimedia Plus

